How to Declutter a Kitchen Before You Organize It
Organizing a cluttered kitchen is like tidying a drawer that is already full: you can rearrange it beautifully, and it will still not close. Decluttering comes first, and it is a different job from organizing. Organizing decides where things live. Decluttering decides whether they live here at all.
The rule for the whole process is simple: organize what remains, not what you started with. Every item you let go of is one less thing to find a home for, one less thing to move when you reach for something else, and one less thing that will drift back onto the counter. Do this first, and every guide that follows — cabinets, drawers, pantry, sink — gets easier, because each one starts with less in it.
Step 1: Set the three piles before you touch anything
Before you open a single cabinet, decide what the three piles are and where each one goes, so you are not making up the rules halfway through:
- Keep here — it belongs in this zone, and you use it at least a few times a month.
- Move elsewhere — it is useful, but it does not belong in the kitchen, or it belongs in a different kitchen zone.
- Let go — it is broken, duplicated, expired, or simply never used. This pile leaves the kitchen today, not “when you get around to it.”
Put a bag or box by the door for “let go” and another for “move elsewhere,” and keep them out of the way of the zone you are working on. The most common decluttering failure is not deciding too harshly — it is deciding, then leaving the piles sitting in the kitchen for a week, where they slowly migrate back into the cabinets.
Step 2: Work zone by zone, and finish each one
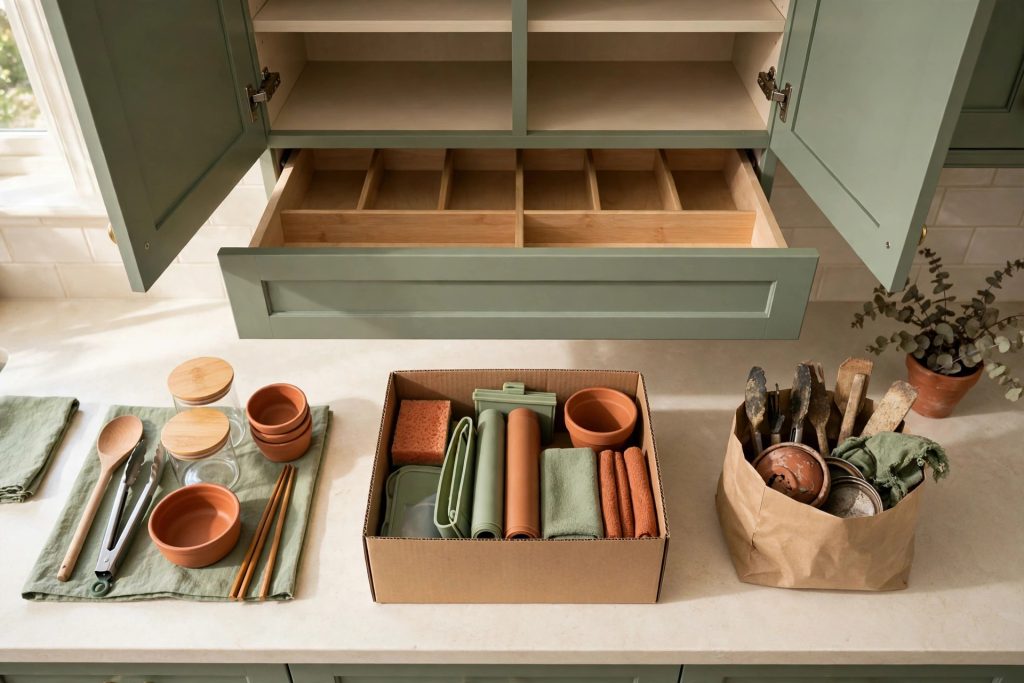
Do not declutter the whole kitchen in one sweep. Pick one zone — one cabinet, one drawer, one shelf, one stretch of counter — empty it completely, wipe it down, and sort everything in it into the three piles before you start the next zone.
Working zone by zone matters for two reasons. First, a kitchen emptied all at once is unusable, and an unusable kitchen is a project that gets abandoned halfway. Second, a finished zone gives you a visible win early: one cabinet that closes properly, one drawer that slides without catching, and the motivation to do the next one. Start with the zone that annoys you most — usually the junk drawer or the cabinet above the fridge — because fixing the worst spot first makes the rest feel easy by comparison.
If you have not set up kitchen zones yet, How to Organize a Kitchen by Zones explains how to divide the kitchen by job (prep, cooking, cleaning, storage) before you sort anything into it.
Step 3: Ask the four questions, in this order
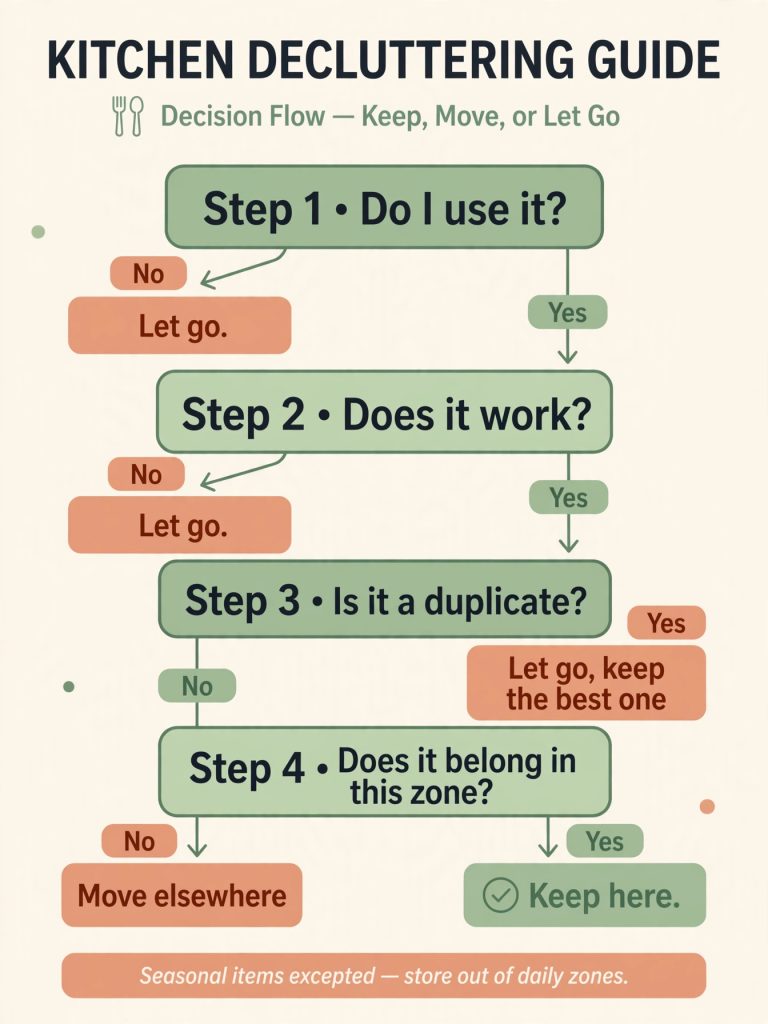
For each item, ask the questions in order, and stop at the first “no”:
- Do I use it? If you have not used it in the last year, the honest answer is usually no — with one exception, below.
- Does it work? A chipped mug, a blunt knife you never sharpen, a gadget with a missing part — broken items are not “useful someday,” they are clutter with a story.
- Do I already have one that does this job? The second spatula, the third baking tray, the duplicate measuring jug: keep the best one, let the rest go. Duplicates are the single biggest source of kitchen clutter.
- Does it belong in this zone? A screwdriver in the cutlery drawer, a pile of batteries with the spices, a stack of takeaway menus in the pantry — these are not kitchen clutter, they are misplaced items, and they go in the “move elsewhere” pile.
The one exception to the one-year rule is the genuine seasonal item: the roasting pan you use only at holidays, the ice-cream maker you use only in summer. Keep those, but store them together, out of the daily zones — up high, or in a less-used cabinet — so they are not taking prime space all year for one week’s use.
Step 4: Handle the five usual suspects
Almost every kitchen has the same five clutter traps. Deal with each one directly, rather than sorting around it:
- The junk drawer. Empty it fully. Keep only what genuinely belongs in an everyday drawer — pens, tape, scissors, batteries — and move everything else to its real home or let it go. One drawer for everyday odds and ends is fine; three drawers of them is not.
- Expired and duplicate food. Check dates as you empty the pantry and the fridge. Expired food goes straight out, and duplicates get used before you buy more. For the pantry side of this in detail, How to Organize a Small Pantry Step by Step covers the same keep-or-let-go pass for food storage.
- Mismatched containers and lids. Match lids to containers now, not later. Any container without a lid, and any lid without a container, goes. This one pass alone often frees a whole shelf.
- Single-use gadgets. The avocado slicer, the egg separator, the gadget bought for one recipe: if a knife, a spoon, or a bowl already does the job, the gadget is decoration. Keep the ones you genuinely reach for weekly; the rest can go.
- The mug and glass surplus. Count them. A household that uses four mugs a day does not need fourteen. Keep the ones you love and use, and let the chipped, stained, and promotional ones go.
Step 5: Clear the counter last, not first
Counters are tempting to clear first because the result is visible, but clearing them first just moves the clutter into cabinets that are still full. Do the cabinets, drawers, and pantry first, and the counter last — by then, there is actually somewhere for the counter items to go.
When you do clear the counter, aim for the same rule used across this site: only the things you use every day stay out. Everything else goes back to its zone after use, or it was never a counter item at all — it was a cabinet item that never made it home. If an item has no home after the declutter, that is information, not a failure: it means the item belongs in “move elsewhere” or “let go,” not on the counter by default.
Step 6: Take the “let go” pile out today
This is the step most people skip, and it is the one that makes the whole declutter stick. Bag the “let go” pile, take it out of the kitchen, and put it where it goes next — donation box, recycling, bin — before you start organizing anything else. Items that sit in a bag by the kitchen door for a week have a way of being “rescued” back into a cabinet, one at a time, until the declutter never happened.
Do the same for “move elsewhere”: walk those items to their real homes now, while you still remember why you moved them. A pile of relocated items sitting in the hallway is just clutter in a new location.
What comes after decluttering
Decluttering is not the end of the project — it is the part that makes the rest of the project work. Once a zone holds only what belongs there, organizing it is a much smaller job:
- Cabinets: with duplicates gone, reach zones actually work — daily items between waist and eye level, rarely used items up high. How to Organize Kitchen Cabinets So You Can Actually Reach Things covers that next step.
- Drawers: with the junk sorted, each drawer can take a single job instead of three. That is the starting point for task grouping, not item grouping.
- Under the sink: the cleaning zone benefits the same way — with expired products and duplicates removed, the awkward space around the pipes has room to work. How to Organize Under the Kitchen Sink Around Pipes applies the same pull-out idea there.
Resist the urge to buy storage before this step is done. New bins in a full kitchen just hide the overflow for a month. Buy storage — if you still need it — after decluttering, when you know exactly what remains and where it actually lives.
Summary table
| Step | What to do | The test |
|---|---|---|
| 1. Three piles | Keep here / move elsewhere / let go, set up before starting | Piles have a bag or box each, out of the work zone |
| 2. Zone by zone | Empty, wipe, sort one zone fully before the next | Each finished zone closes and slides properly |
| 3. Four questions | Use it? Works? Duplicate? Belongs here? | Stop at the first “no” (seasonal items excepted) |
| 4. Five suspects | Junk drawer, expired food, lidless containers, single-use gadgets, mug surplus | Each trap dealt with directly, not sorted around |
| 5. Counter last | Clear counters only after cabinets and pantry | Only daily-use items stay out |
| 6. Pile out today | “Let go” and “move elsewhere” leave the kitchen now | Nothing sits bagged by the door for a week |
Frequently Asked Questions
How do I declutter a kitchen without throwing away things I need?
Use the four questions in order — use it, does it work, is it a duplicate, does it belong here — and keep genuine seasonal items, stored out of the daily zones. The test is use, not sentiment: if you have not used it in a year and it is not seasonal, you do not need it in the kitchen.
Should I declutter or organize first?
Declutter first, always. Organizing a full kitchen just rearranges the clutter. Once only what belongs remains, organizing is a smaller job, and the zones, reach levels, and drawer jobs in the other guides actually work.
How long does decluttering a kitchen take?
Zone by zone, most kitchens take a few focused sessions, not one marathon day. One zone at a time keeps the kitchen usable throughout, and each finished zone is a visible win that carries you to the next.
What do I do with the things I remove?
Take the “let go” pile out of the kitchen the same day — donation, recycling, or bin — and walk “move elsewhere” items to their real homes immediately. Piles left sitting in the kitchen migrate back into cabinets.
Do I need to buy storage to declutter?
No — and buying it first is the most common mistake. Declutter first, then see what remains; only then, if something still needs a home, buy the one bin or riser that fits it.
Shop This Guide’s List
Prefer to shop it all in one place? Every product in this guide is collected in our Benable list: Kitchen Decluttering Essentials for a Kitchen That Starts With Less — tap any item to see it at the store.

5 Comments